What Is HubSpot’s Call to Action (CTA) Tool, Benefits & How to Use It

Making sure your website engages and converts visitors as much as possible is one of the most important things. That’s why it’s so important to create CTAs people want to click on and follow!
The good news is that you don’t need to have any design knowledge to create amazing CTAs. What you need is the HubSpot Call to Action tool, which allows you to create CTA pop-ups and buttons in just a few minutes.
With the HubSpot CTA tool, you can either create CTA buttons and pop-ups that look professional or you can upload your custom designs to easily insert the CTAs all over your website.
CTAs are a must not only on web pages, but also on blog posts, landing pages, and even emails such as newsletters. Why? Because they are the gateway to conversion. As such, the HubSpot Call to Action tool provides amazing benefits and we want to explore them here today.
What Is the HubSpot Call to Action Tool?
In a nutshell, the HubSpot Call to Action tools allows users to create, test, personalize and optimize CTAs. It’s a CTA builder that doesn’t require any expertise on your end. You don’t have to know about design or anything at all to create CTA pop-ups and buttons for your pages.
Perhaps the best thing about the HubSpot CTA tool is that it gives you all the information you need about the type of people who visit your website. This is based on your contact database and it helps you create CTAs that appeal to them. In turn, this makes the buttons or pop-ups more effective.
With the tool, you can also target anonymous website visitors using details such as language or location. The HubSpot CTA tool also allows you to A/B test and analyze the CTAs you create. This way, you can optimize them to improve their performance. Additionally, the tool provides a dashboard where you can easily manage your CTAs and have access to data such as views, clicks, and conversions.
Why You Should Use the HubSpot CTA Tool
HubSpot CTAs allow you to do so many things, so it’s a very useful tool that will save you time and effort in many different ways. For example, if you’ve ever created a button and added it to many different pages only to change your mind about the text, you will love HubSpot CTA. It will allow you to make updates to all your buttons whenever you like.
It’s also common for people to come up with a couple of CTA ideas at a time. When that happens, you want to test them both to see which one is more effective. With HubSpot CTA, that’s not only possible, but it’s also extremely easy.
What if you want a CTA button to show something different to prospects and customers? Well, the HubSpot Call to Action tool will help you do that. Moreover, the tool provides comprehensive analytics that shows you how many times a CTA button was viewed, how many times it was clicked, and how converting it is.
HubSpot CTAs are just amazing but they’re still one of the most underused features. That’s why we want to discuss the benefits and help you understand why you should be using it to your advantage.
The Benefits of the HubSpot CTA Tool
1) It Allows You to Manage All CTAs in One Spot
The HubSpot Call to Action interface is as simple as it gets and it provides central management. If you use CTAs in multiple locations, such as several website pages and emails, you can just update the CTA in the dashboard and the changes will automatically apply everywhere the CTA is present.
For example, let’s say you have a “Contact Us” button on all landing pages on your website. If you’d like to change it to “Schedule a Call”, you can just go to the HubSpot CTA dashboard, update the text, and the update will apply everywhere on your website.
2) You Can A/B Test Your CTAs
One of the best things about the HubSpot Call to Action tool is that it allows you to A/B test your creations. You will be able to test as many as 50 variations of one CTA, which is very useful. There are many ways you can word your CTA, so testing those variations to see which one offers the best clickthrough rate will make your CTA efforts more effective.
For example, let’s say that you want to add a CTA to prompt blog post readers to join your newsletter. You can test variations like:
- Join the club
- Sign me up
- Get instant access
- I want in
- Grab your freebies
- Get it now
And so many more! This way, you can determine which CTA will work best and have greater chances of success.
3) You Can Create Tailored Content on Your CTAs
Another great benefit HubSpot CTA provides is that it allows you to tailor your CTAs based on the viewer. For example, if you get a new visitor, your CTA should make an introductory offer.
But if the visitor has already made a purchase, they are already a customer, so the offer on your CTA should be different. In this case, you should be asking them to become a VIP or something else to further loyalty and keep them active.
4) It Provides Useful Reports
Last but not least, the HubSpot Call to Action tool provides reports so you can see how many views, clicks, and conversions your CTAs get. This allows you to see which ones are working and which ones are not.
With this information, you can adjust your strategy and lean on what’s most effective so you can get more leads, increase your conversion rate, and have a more successful website overall.
How to Use the HubSpot CTA Tool
As mentioned earlier, you can do many things with the HubSpot CTA tool. You can create buttons, and pop-ups or upload your own designs, test your CTAs, etc. Today, we will focus on how you can create a CTA button using this helpful tool.
If you want to create a CTA button from scratch, you need to:
- Log into your HubSpot account.
- Go to the Marketing tab.
- Click on Lead Capture.
- Click on Button CTAs and then Create CTA.
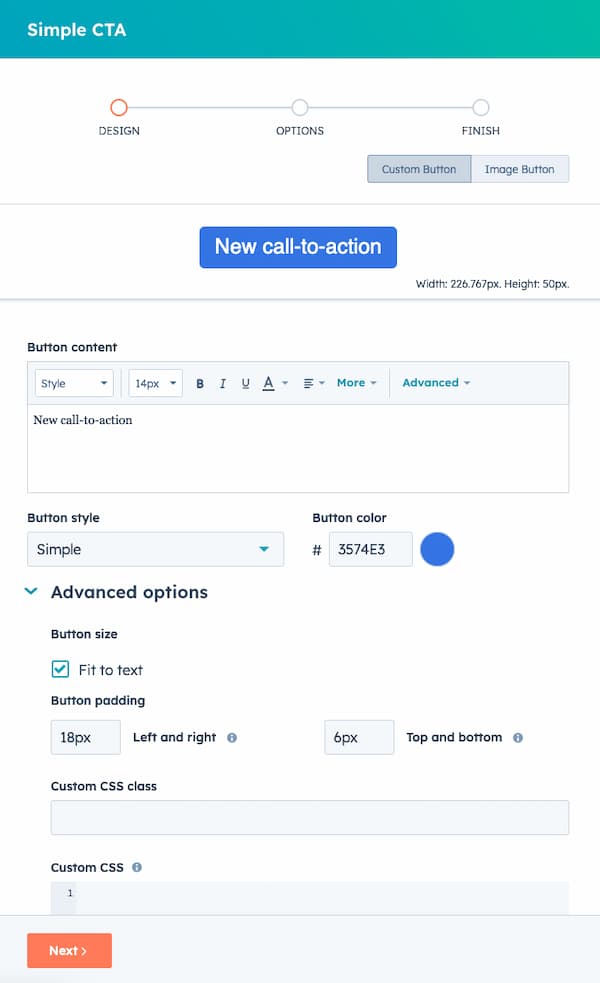
Once you’re in the CTA builder, you can click on “Custom Button” in the top right of the screen to start customizing.
Now, you have different options for customization, such as:
- Button content: Your CTA needs text, so this is where you prompt the visitor to do something. Whether that’s “Contact Us” or anything else. Emojis are allowed and visitors will see them in the native style of their device.
- Button style: Here, you can check out the style options. If you just want the CTA to look like a regular link, select the “Link (No Style)” option.
- Button color: Of course, you can choose a color for your CTA button or enter a custom one to keep the button cohesive with the rest of the website.
There are also Advanced Options available where you can customize things like CSS styling and pixel padding. Once you’re done creating the CTA button, click Next.

If you don’t want to create a custom CTA button, you should click on “Image Button” instead. The option is right next to Custom Button. This will allow you to upload a design you’ve already created.
Once you select the image from your file manager, you can adjust the height and width of your CTA button. Additionally, you’ll be able to add alt text to the image. Once you’re done, click Next to proceed.
How to Set Up Options for the CTA Button
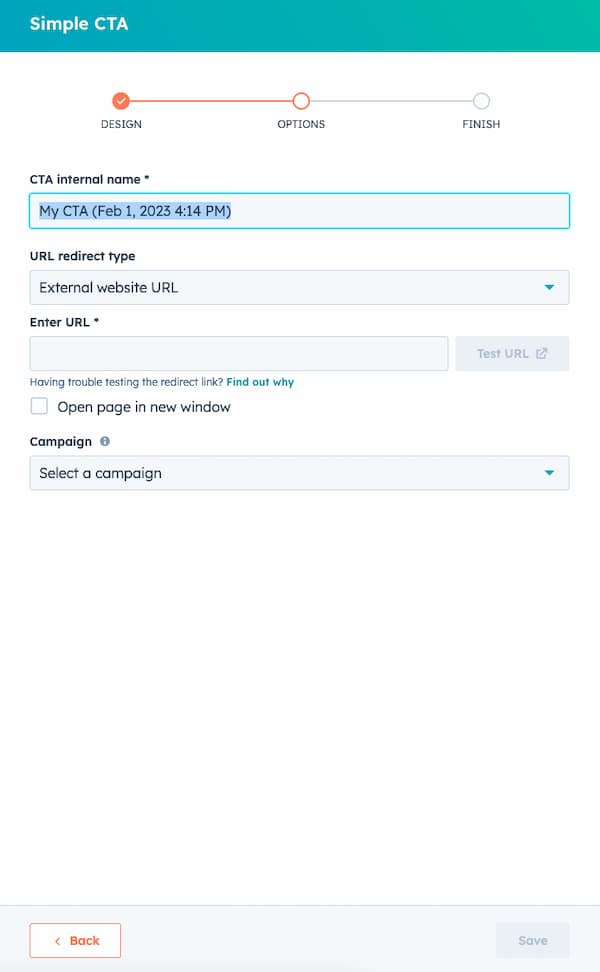
When you click Next, you’ll be taken to the Options panel, which is where you’ll set up the options for your CTA button. Here’s what you need to configure:
- CTA internal name: Give the button a name, this will only be seen by those who have access to the HubSpot account.
- URL redirect type: Determine where you want visitors to be redirected to when they click on the button.
- External website URL: Link an external URL to your CTA button by entering the link.
- HubSpot page or blog post: Link an internal HubSpot page or blog post to your CTA button. Just select the one you’d like from the dropdown menu. If changes are ever made to the URL, the link for the CTA button will automatically update.
- Meeting link: Link your button CTA to a HubSpot meeting by following these steps: Click the "Choose a meeting link" dropdown. Select a meeting link from the options. If you'd like the link to open in a new page, check the "Open page in new window" box.
- File link: You can also link a file to your CTA button, you just have to upload it from the file manager and check the box that says “Open page in new window”. This way, visitors will be able to see the file in a new browser window when they click on the CTA.
- Email or phone number: You can use a mail to link or create a link for people to call a phone number.
Additionally, you can associate each CTA button you create with a specific campaign. This way, the analytics will be linked. Just select the campaign from the dropdown menu. Then, you can save your CTA button and it will appear at the top of the relevant page.

Summary
There’s a lot more you can do with the HubSpot Call to Action tool, but creating a CTA button is a must. It’s a simple process and it will help you convert leads from any page or blog post on your website.
While HubSpot’s CTA tool is so beneficial, it’s heavily underused. We hope this article will inspire you to jump on the bandwagon and start taking advantage of it. Once you do, you’ll realize creating click-worthy CTAs has never been easier!